
Turn a voice ramble into a finished post
Talk through your idea out loud, then hand the transcript and the notes you saved with Memo to Floatboat. It shapes them into a post with a title and sections that still sounds like you.
Chris hosts a weekly podcast and writes a blog post to go with each episode. The ideas come easily when Chris is talking. Sitting down to type them up is another story. So this week, Chris paced around the room, talked the idea through out loud, and let Floatboat turn it into a post.
You can write this way too. Floatboat writes down what you say as you say it. When you're done, hand it over to be shaped into a post, then fix a few lines yourself. Most of the time goes into talking. Floatboat only needs a minute or two to shape it up.
Before you start
- A microphone. The one built into your computer is fine, and so is a headset. Flow Mode listens through your computer's microphone, so if you walk around while you talk, stay close enough for it to hear you.
- An internet connection. Your speech is turned into text online, so stay connected while you record.
- An Agent Space for your posts. An Agent Space (a space, for short) is where Floatboat keeps one piece of work together, with its files and tasks. In the example, it's a space called Podcast blog, with drafts and published posts in its folder. Don't have one yet? See Keep each project in its own Agent Space.
- Notes you've collected along the way (optional). A listener's email, a line you want to quote: copy it, click the Floatboat icon in your Mac's menu bar, and save it with Memo into this space's folder. If the folder isn't listed in the small window, click Select Other to find it. The example uses two: a listener's question and the episode's release date. Memo is Mac only for now. If you don't have any notes, skip this. To learn how, see Keep snippets at hand with Memo.
The first time, you'll be asked about the microphone
The first time you click Start Recording on a Mac, macOS asks whether Floatboat can use your microphone. Allow it. Windows usually doesn't ask, but if the microphone is turned off in your privacy settings, Floatboat opens the right settings page for you. For details, see Write by talking with Flow Mode.
Step by step
Open Flow Mode and click Start Recording
First pick the space for your posts in the sidebar, then click Flow Mode. Floatboat opens a fresh, blank document with a small panel in its top-right corner. Click Start Recording and start talking.
You don't need notes or a script, and you don't need to say the punctuation. Say things in whatever order they come to you. If you go off on a tangent, keep going. Sorting it out comes later. The sentence you're in the middle of shows up right away and settles into place once you finish it.
Click the round microphone button when you're done
While you're recording, the panel in the top-right corner shrinks to a round microphone button. Click it to stop. Need a breather? Same thing: stop, and when you're ready, click Start Recording again. Whatever you say next is added to the end of the same document.
Once you stop, Floatboat reads what you said and gives the document a name, like "Why I stopped scripting the show".
Select everything and hand it to Floatboat
Click anywhere in the document and press ⌘A (Ctrl+A on Windows) to select it all. A small toolbar pops up next to the text. Click Chat. The Chat panel opens on the right, and a small tag with line numbers appears in the chat box, like "Why I stopped scripting the show.md:1-7". That's how Floatboat knows which text you mean.
Chat adds the text to whichever task is open in the Chat panel. To start a separate task for it, click the + at the top right of the Chat panel first (it says New Task when you point at it), then select the text and click Chat.
Then type what you'd like after the tag and send it. For example:
Turn this into a blog post with a title and short sections. Keep my voice, and use my Memo notes in this space too.
You'll get closer to what you want if your request covers three things: what it should become (a blog post, a newsletter, episode notes), whether to keep your own wording, and which notes to use.
Click Approve before it saves the file
Floatboat first says how it plans to go about it, reads your voice note and your Memo notes, and then starts writing. With the default Ask Every Time setting, Floatboat stops before writing a file and shows a Permission Required panel. Check the file name in the step above it, then click Approve. For the other choices on that panel, see Work on a task with Floatboat.
When it's done, a Created 1 file card appears under its reply. Click the card, then click the file name, and the post opens in the preview on the left.
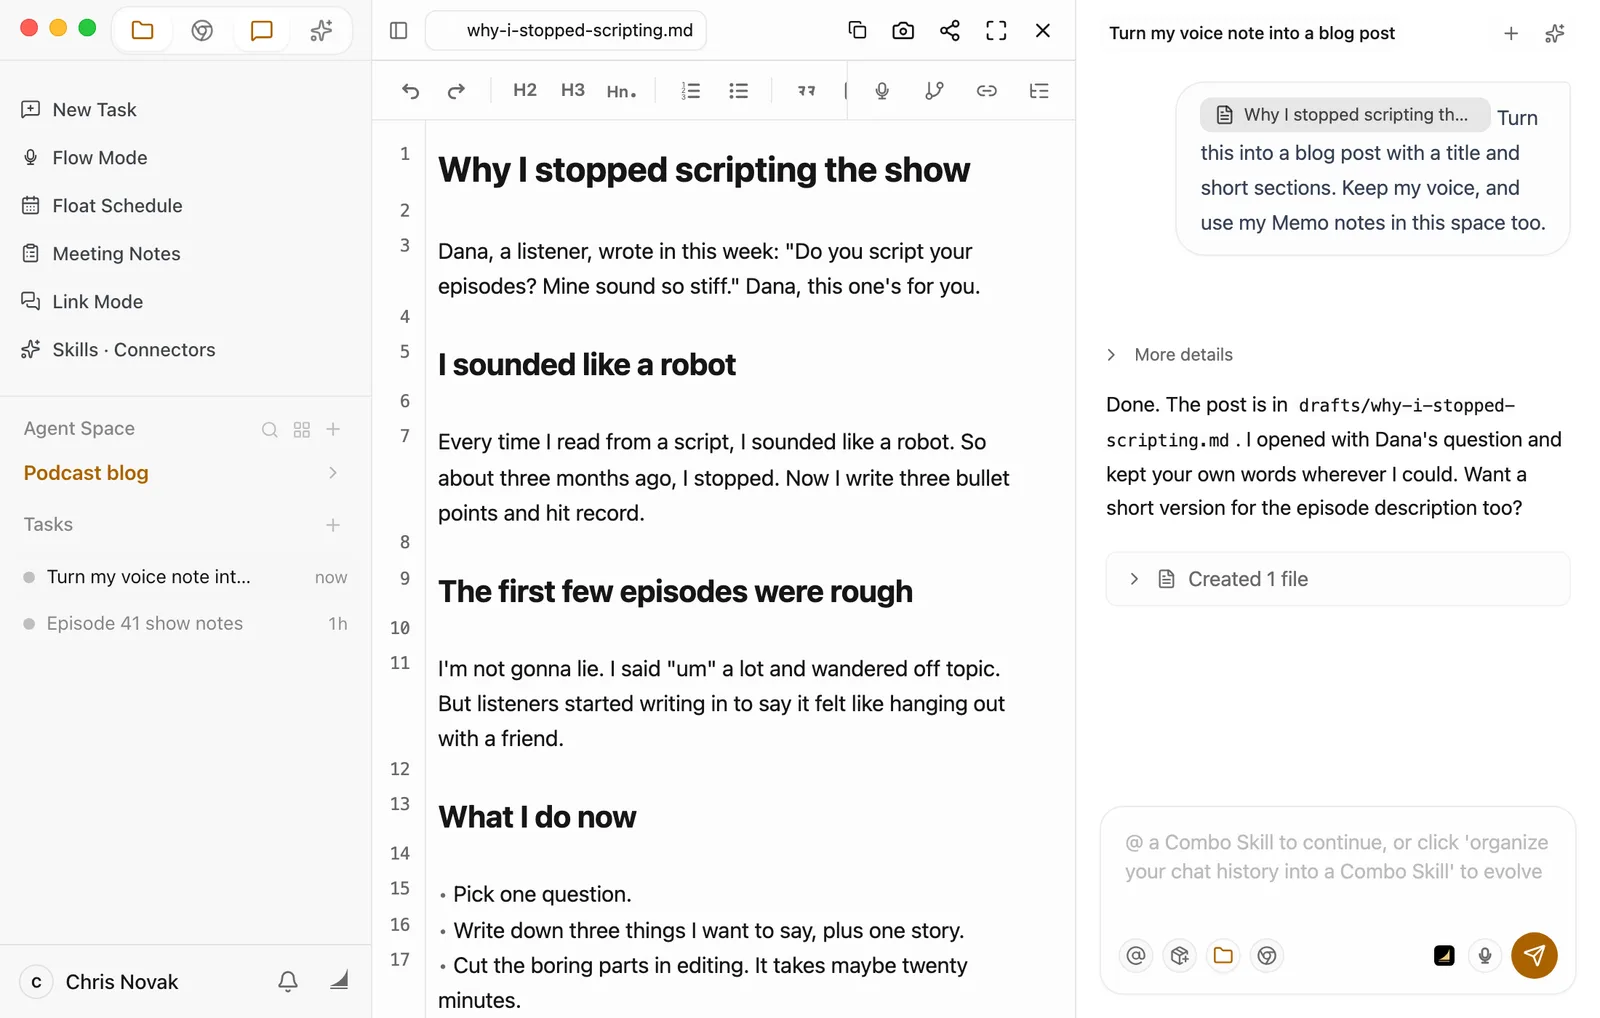
Fix a few lines yourself in the preview
The post is an ordinary Markdown file. Click into the text and type. About half a second after you stop, it saves itself, so there's no save button to hunt for. Add a detail only you would know, and it reads even more like you.
For bigger changes, keep talking in the same task. For example: "The second section is too long. Cut it to three sentences." or "Make the title sound more casual."
Make it yours
The steps stay the same: talk it through at your computer, select everything and click Chat, then say what it should become. The only things you change are what you talk about and that one request.
- An interior designer back at the studio after measuring a client's home talks through what the client wants and what the rooms are like. Change the request to: "Turn this into a one-page design brief: each room's size and current state, what the client likes, the budget, and questions to confirm next time."
- A personal trainer talks through how a client did today and what to add next week. Change the request to: "Turn this into next week's training plan for this client, day by day, with exercises, sets, and things to watch out for."
- A product manager walks through an idea for a new feature and keeps a few pieces of customer feedback, saved with Memo, in the same space. Change the request to: "Turn this into a one-page spec: background, the problem, the proposal, and open questions. Use the customer feedback in this space."
Save time next time
- Save it as a Combo Skill. A Combo Skill is a saved way of doing a certain kind of job, so Floatboat can do it the same way every time. If you like how this one turned out, say in the same task: "Save how we did this as a Combo Skill called 'Voice to post'." You can also click Organize to Combo Skill below the chat box, then Create. A skill made that way starts out empty, so follow up with "Write the steps we just followed into this Combo Skill." Next time, after you select your transcript and click Chat, type @ in the chat box, pick the skill, and add a line about this week's episode. See Save what works as a Combo Skill.
- Teach it how you write. First open this space's folder in the Files panel. Then, in a task in this space, say: "Remember: when you turn my voice notes into posts, keep paragraphs short, skip exclamation marks, and end with a line about next week's episode." Floatboat writes this into the AGENTS.md file in this space's folder, and new tasks in this space follow it. See Help Floatboat remember how you work.
Having trouble?
- I clicked Start Recording, but Settings opened instead. Floatboat doesn't have microphone access yet. Turn on the switch next to Floatboat. On a Mac, quit and reopen Floatboat afterwards.
- I selected the text, but no toolbar popped up. Click in the text first, then press ⌘A (Ctrl+A on Windows). If you've used Edit with voice, select and speak and annotations are still waiting in the panel, the toolbar stays out of their way. Click Send to Agent or Clear, then select the text again.
- The post doesn't sound like me. Keep going in the same task, for example: "Use my original sentences as much as you can. Only change the order and cut the filler words." And if a later edit goes wrong, whether yours or Floatboat's, you can get the earlier text back: click Version history near the right end of the editing buttons and restore an earlier version.
- It didn't use my Memo notes. Make sure the notes are saved in this space's folder, not in the default memo folder. You can also drag the note files into the chat box, or right-click them in the Files panel and choose Add to Chat, then send your request again.
- I can't find a voice note from earlier. Click Flow Mode in the sidebar, then click Expand navigation at the top left of the document. The list on the left shows all your Flow Mode documents.
What's next
Write by talking with Flow Mode
Recording, taking breaks, editing with your voice, and where your Flow Mode documents are saved.
Work on a task with Floatboat
Ask for what you need, follow along while Floatboat works, and step in when it asks for your OK.
View and edit your files
Edit your post in the preview, and use version history to undo a change that went wrong.
Tailor your résumé to a job posting
Hand a job posting to Floatboat, have it compare the posting with your résumé, then save a version of your résumé for that job and a cover letter, and finish them yourself in the preview.
Hand off work when you're away from your desk
Before you leave, connect your computer to a chat app like Slack. On the road, send a message from your phone, and Floatboat looks through the files on your computer and sends the answer back to the chat. Back at your desk, keep going in the same task.